Pages

Monday, April 1, 2013

Kiss My Face

I half mentioned in my "comeback post" that one of the things I've become obsessed with in 2013 are my choices in household and beauty products. And obsessed really is a good word. I feel almost OCD over it all, and even if I tried, I don't think i could get myself to stop.

This is that part where I could get up on a soapbox and preach about the evils of animal cruelty and animal testing, but that's not what I'm about, that's not what this blog is about, and I respect everyone's right to make their own decisions. For me, I look down at Tessie and the thought of anyone hurting her is enough to make me fall to pieces. Sooooo, on that note, you may start seeing reviews on products that I've been trying to incorporate more into our daily lives and most of these will include the phrases "cruelty-free" or "no animal testing." Like this one.


I ran across Kiss My Face while looking for a cruelty-free sunscreen. My one and only New Year's resolution was to stop tanning since I know it's bad for me, and I'm finally starting to see the effects of it (wrinkles? check. freckles? check). I actually have pretty fair skin, but thanks to the Portuguese on my dad's side of the family, I can rock a wicked tan. But, we all know evetually our sun worship catches up with us, and since summer starts early in SoCal, I needed sunscreen pronto.

Ok, I know you're looking at the picture and thinking...that's not sunscreen. Nope, it's not. I haven't actually used their sunscreen yet. And since I'm a hands-on gal, I wanted to do a sniff test before I committed to anything in the KMF line. Thankfully, our local Henry's carries a nice variety of their products, including their body lotion. Another thing my sisters and I inherited from our dad is ashy skin, so lotion is not a luxury in my beauty routine, it's a necessity! After sticking my nose in a few of the bottles ("Olive & Aloe" was also a contender as was "Mango") I settled on "Peaches and Creme" because it actually smelled like a freshly sliced peach (and with Jason being from Georgia, peaches have a special place in my heart).

As soon as I got home I gave it a try. On first pump, I was nervous because the lotion came out a little thin and liquidy; once I started to apply it though the consistency got thicker as I rubbed it in. All in all I was quite please with the way it felt (and smelled!) on my skin. Although it makes me crave peach cobbler like it's nobody's business!

Overall impression: I'll buy it again, and probably in the other scents as well!


Note: I have not been paid, perked, or in any other way endorsed to review Kiss My Face.   

Friday, March 29, 2013

Spring digits

Spring has sprung (finally!) and we're lucky enough to have those gorgeous pink blossoming trees right outside our bedroom window! So I took my cue from mother nature when I visited my favorite local haunt for my favorite way to pamper myself. 


Nubar is a cruelty-free brand that my salon just started carrying, and they have some of the most delicious pastel colors I've ever seen! Like wearing a bag of Easter jelly beans on your fingers and toes! Bonus, it's made without all the harsh chemicals like toluene that traditional polishes pack in their bottles. To spice it up, and play with some of my Pinterest pins, I added a little nail decal post-salon visit. I love the accent nails everyone is wearing lately, although traditionally an accent nail is the ring finger. Since my job involves a lot of pointing, I figured it was worth making sure those nails were the most fancy!

I'm loving this shade! It's like that perfect girly-pink without being too Barbie-pink. And my toes are sporting the matching hue and decal as well (although I offset my piggies, and did the decal on my second toe).

Yay spring!  

Wednesday, March 27, 2013

Hungarian Cabbage Noodles

So, Jason and I have been pescetarians since 2007. Aside from the odd craving for ribs (we could pack away some ribs!), we don't miss red meat. I know some of you are gawping in shock thinking of steak or prime rib right now, but we were never big meat eaters to begin with so it wasn't a huge leap to cut it out of our diets. As a result, we've been the recipients of many vegetarian cook books from our loving (but think we're pretty crazy) families.

This is the one I'm digging right now. The recipes are super fast, super easy, and at only 5-ingredients per recipe, I'm not shopping for a bunch of random items I'll use once and then throw away when they've rotted in the fridgidator (no that's not a typo, that's actually what I call it).

I've tagged a bunch of recipes to try out (some of the smoothies have me stupid excited, which feels odd the say about food), so with each grocery trip, I'm trying to include one or two new meals into our usual rotation. Recently we tried this one (we changed this recipe up a little to suit our preferences, and to use what we had on hand; our "changes" will be noted in blue).


Basic Ingredients
2 tablespoons light olive oil
1 large onion, quartered and thinly sliced
1 16-ounce bag shredded cabbage coleslaw (or small head of cabbage)
12-ounces wide egg noodles, preferably yolk free
1 tablespoon poppy seeds, or as needed (we used toasted sesame seeds)

1. Heat the oil in an extra-wide skillet or stir fry pan. Add the onion and saute over medium heat until golden. Add the cabbage and a small amount of water; cover and cook, stirring occasionally, until the cabbage is limp and just beginning to brown lightly, 10 to 12 minutes. I also added a splash of soy sauce for a little extra flavor.

2. Meanwhile, cook the noodles according to the package directions and drain. Transfer to a large serving container.

3. Add the cabbage mixture and poppy seeds (or sesame seeds) to the noodles and toss gently but thoroughly. Season to taste with salt and lots of pepper, and serve.

The dish may seem a little bland at first, but if you brown your onion to where it's almost caramelized  it adds a very sweet flavor to the noodles. Next time Jason and I want to add other veggies like celery, mushrooms, and maybe even broccoli. A little splash of teriyaki sauce and it gives it even more of a stir-fry feel!

Sunday, March 24, 2013

2013: our story so far...

It's March.

Almost April.

It's been a busy year so far. Jason is fully ensconced in his USMC recruiting billet, which includes working nights, weekends, and every hour in between. Seriously, my husband is pulling 16-hour days 6-days a week. It's ridiculous. But like any duty assignment we know it's not permanent and we're just thankful we still get to be in Southern California. As for me, I'm now coming up on 8 months in my new position. Rewarding/exhausting/fulfilling doesn't even begin to describe how I feel about my job. Going from being low-man on the totem pole to being part of a management team has been one of the highlights of my clock-punching history. 

But our lives make for pretty dull conversation. 

"How are things?"

Busy!

"What have you guys been up to?"

Working!

"What do you do on the weekends?"

Nothing!

Snooze-fest! Haha, but there is something to be said about finally having a routine. And although to some it's their idea of a suburban nightmare, to us it's been pure bliss. 

Other noteable happenings:
- We celebrated our seventh wedding anniversary on February 19 (ladies and gentlemen  we've officially reached the seven year itch phase!)
- Tessie has officially been part of the family for 2 years now (March 17, 2011)
- We're coming up on our first anniversary of living in our "chosen" city (not digging the rental scene much anymore, but with 8-years left in Jason's military career, this isn't a time for us to look at buying) 
- I'm obsessed out of my head with currently reevaluating my choices in beauty and household products (for some reason 2013 is the year I became really conscious about what goes on my body and in our living space)
- We've both agreed to start making a better attempt at using all the amazing cookbooks that have been given to us over the years (our current favorite is one with 5-ingredient vegetarian meals)
- We have officially kicked our Starbucks habit (I was a venti-a-day user, so for me this has been very satisfying--not to mention wallet friendly)

I'd say I'm hoping to get back to blogging regularly again, but I feel like that just sets me up for failure. So we'll just keep our fingers crossed on that one, mm'kay?


Tuesday, January 1, 2013

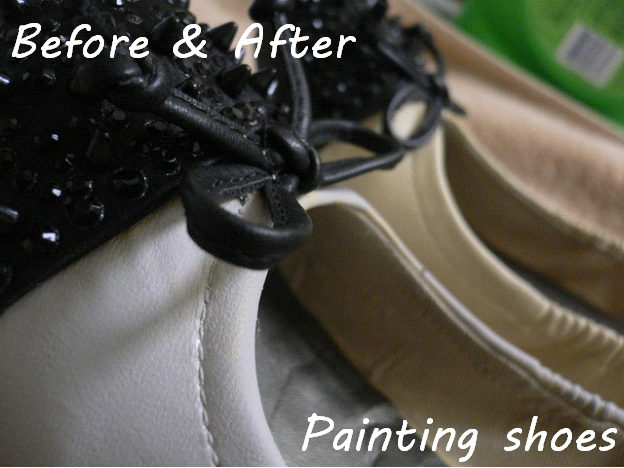
Painting shoes {a tutorial}


We have done absolutely nothing today, and it's been blissful. Me, Jason, and Tessie have all be snuggled in bed; it has turned into our town. Although I have been spending some quality time with my dear friend Pinterest! Getting hooked on new blogs and new ideas for replenishing and remixing my wardrobe with nothing more than my sewing machine (I'm currently hooked on Merrick's Art, which is making want to re-evaluate every piece of clothing in my closet to find ways to improve them). And it made me wonder, can I paint shoes? If you haven't seen this pin, it's where I got my idea.


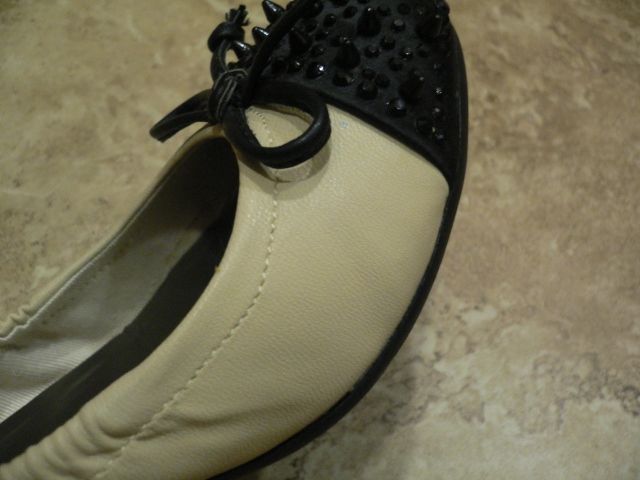
I have a pair of ballet flats from Khol's, from their Simply Vera by Vera Wang line. I'd purchased them originally because they reminded me of an expensive pair that my mom had by Sam Edelman (she bought hers at Nordstrom's for upwards up $150). Mine were $30. The only problem was after I got them home, I realized the color wasn't quite as "neutral" as I'd thought they were. So they sat in my closet, unworn, but loving gazed at, and waiting for the right outfit (the pictures make them look like a much lighter shade than they really are--they're almost more of a light brown than a white wash khaki). Today I decided to make them the right color for my outfits.


I started by mixing some acrylic paints I had sitting around the house. I knew I wanted a gray-ish color since I have a lot of blues, blacks, and grays in my wardrobe. Then I mixed it with some fabric medium (the stuff everyone is using to paint furniture fabric these days). You can kind of tell by the picture that these shoes are a faux-leather. I figured fabric medium was my best bet to keep the paint flexible enough to where it won't crack after I wear them for a day.
 
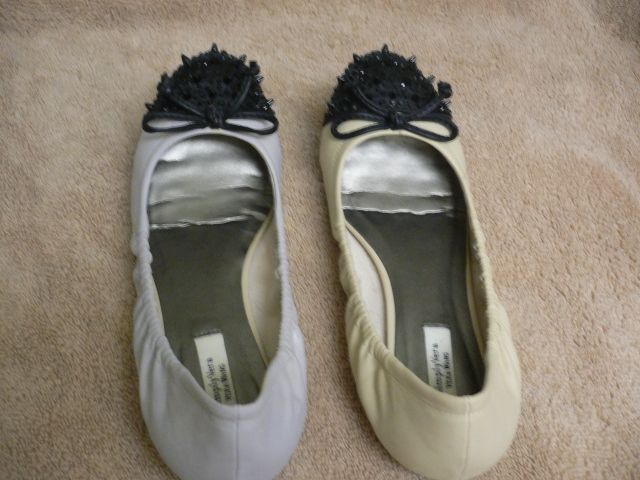
Then (using a tiny make-up brush I never use) I just started painting. I started on the underside and worked my way to the top so that the bottom would be dry enough to set down once I was finished. This was the result after the first shoe was finished (you can see the difference better between the gray and the "khaki").


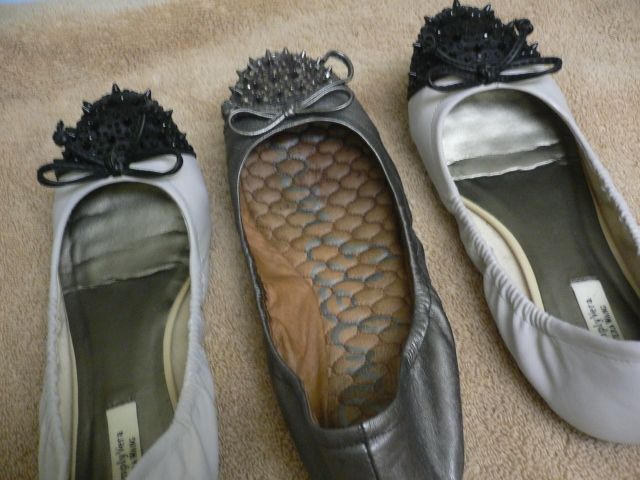
Since I was pleased with the results, I moved onto the second. I'm so happy with how they turned out (and how easy it was to do). The entire process took maybe 10-minutes for each shoe. Here they are next my inspiration. The Sam Edelman shoes are way more metallic than mine, but now that I know this method (seems) to work, I may try to find a metallic acryllic paint (do those exist?) and give it another go.


In the meantime, I stashed the remaining paint mixture in an empty acryllic paint bottle for any touch ups I might need. Once I've worn them a few times I'll update with how they're holding up! Happy painting!

Saturday, December 22, 2012

Bin me up, Scotty!

Ok, that was a supper cheesy Star Trek reference, but I couldn't help it. But at least I'm finally getting some freaking Christmas pictures up!

Side note: it has taken me two very depressing years to get my Christmas cheer back. I don't know why it went away, I don't know how or why it came back, but all I know is I am embracing it with open arms. So forgive me if I am spouting Christmas excitement and annoying projects like a fountain.

If you're like me, you drool every year over Pottery Barn's beautiful but expensive tree skirts. This one has always been my particular favorite since it matches our stockings. It just also happens to be $129 before monogramming, tax, and shipping. Ouch.


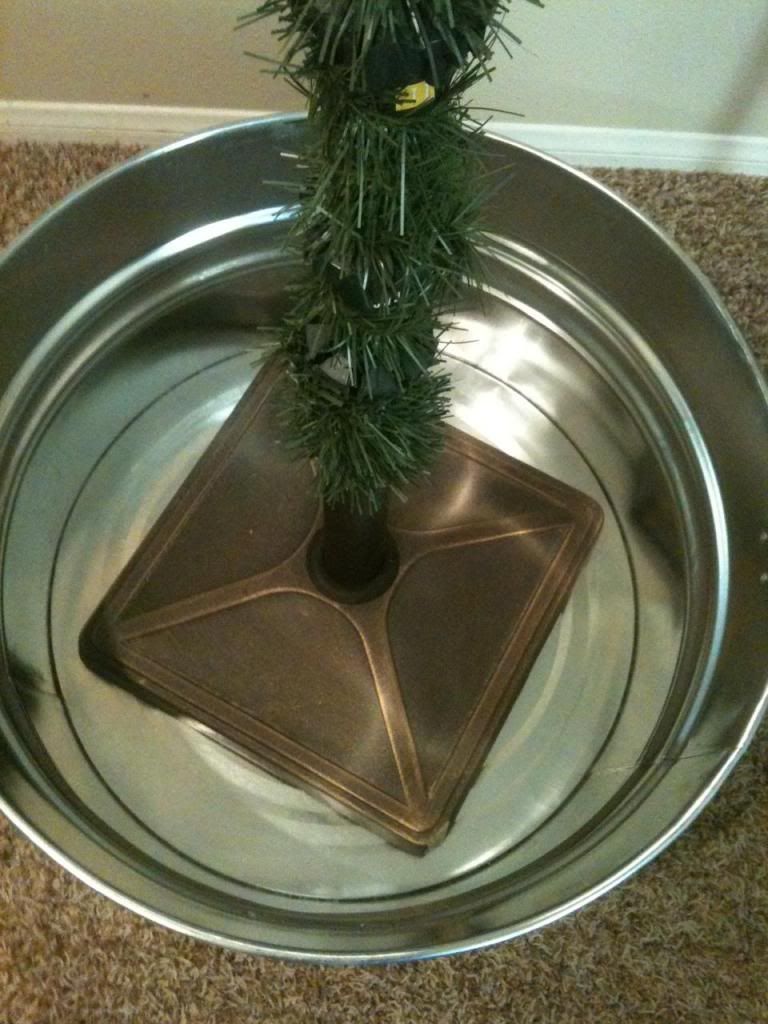
But the bottom of a faux tree is U-G-L-Y! I've tried covering it with multiple items over the years without much success. Everything just kind of looked cheap. So this year I opted for an old reliable fallback: galvanized tin. We grabbed a $20 bin from Home Depot (this guy was with the trash cans). Unfortunately the original base was too big for the tin, so we improvised. If you run into the same snag, we used an outdoor umbrella base to keep ours steady--heavy enough so the tree wont topple over, the tree fit inside perfectly, and the base fit into the tin with room to spare! 


Here it is in all its glory (I used this method for lighting our tree and it was much more simple than going round and round and round like we usually do). The glittery white star we got on clearance from Target a couple years ago. It had a "halo" of colorful balls around it that I snipped off using garden shears.


A few of our favorites on the tree: glass snowflake ornaments from Target (from our first Christmas together in 2005), these Big Lot ornaments that look way more expensive than their $4 price tag (and technically $4 got me a pack of 8, so really they were all of 50¢, and of course our Marine Corps cover (one of many patriotic ornaments we've collected over the years).


Oh and FYI I'm sorry for the fuzzy iPhone pictures, but these were shot before the Lumix was in the process of getting fixed, and the memory card getting corrupted. 

Wednesday, December 19, 2012

a.m. + p.b. = l{♥}ve

Ok, so my blog keeping skills totally suck, but give me a break. I still haven't managed to balance a full time job and projects. Usually they're all crammed together in one weekend and it takes me weeks to photograph and blog about anything. Plus, imagine my disappointment when after finally getting our Lumix fixed, the freaking memory card became corrupted and refuses to hold any photos. Cue the Queen saying, "We are not amused!"

Our house looks so ridiculously cute with all it's Christmas decor, and even if it takes braving the craziness of the stores this holiday season, I will get it photographed this weekend. #famouslastwords But anyhoo, I have to do a happy dance about the deal I just got on some pillows from the big PB. No, the other PB--Pottery Barn!


Thanks to getting our Christmas shopping done early this year, we snagged two thank you's from Pottery Barn in the form of $10 gift cards (I don't know if this is actually because we shopped during a specific time period  but I'm an early-Christmas-shopper nerd, so I will take this as positive reinforcement).

Today I was more than delighted to see that their pillows were all 30% off, plus they were offering free shipping. Thinking ahead to that awkward in between phase of Christmas and Valentine's Day (or whenever the decor starts changing in our house) I wanted some neutral "winter-ish" pillows. These are what I grabbed (virtually speaking that is).


I'm kind of a sucker for typographical fabric prints (like this rug that I've always loved from Ballard Designs) and the simple color of this pillow was right up my neutral winter-ish alley. Then I grabbed this one for our bedroom, because I'm obsessed with greens and browns together (plus once I finally hang our Braemore curtains the colors will jive together without being too matchy-matchy). Technically I think this is supposed to be a map of Paris, but... I just think it's pretty.


The best part? Both pillows were marked down to $13.99 from $34. With the free shipping offer and the gift cards, I paid a total of $8.60! Less than $10 for two Pottery Barn pillows--how can you not love that?

Tuesday, November 27, 2012

Baby it's cold outside

Ironically, I remember using this same title back on Two Nuts in a Shell when we first moved up to 29 Palms in January 2009. It was completely apt since the temperatures dropped so low it froze our shampoo that we'd left outside in the car...

Some of my favorite pins that I've saved for the holiday season have to do with classic Christmas songs.


I've done a couple mock ups (and am planning on a chalkboard project here soon to incorporate some more), but this one is currently my favorite. Forgive the iPhone pictures--our Lumix is in the process of being fixed finally! <--- Cannot tell you how excited this really makes me!


It sits on our side table in our living room. I opted to go with the charcoal grey for a few reasons: one, it's become a neutral in our house. Two, there is a whooooole lot of red going on in our living room and I needed something (anything) to tone it down a little. Three, we have a grey and white rug in the living room and I thought it would be a nice way to bring that out a little. Plus, I can use it well into January and February once the red and green Christmas decor goes back into storage.

And yes, I do already have up our tree, and a bunch of other Christmas decor. I'm a Thanksgiving Day turns into Christmas kinda girl!

Because our computer is a dinosaur and because I'm too cheap to spring for Photoshop, I whipped this up in MS Word. Super easy, super quick, and super cheap! F-R-E-E. My favorite price around the holidays! ;)

Sunday, November 25, 2012

Giving thanks

I was hoping to be more productive on our bedroom curtains, but the day before Thanksgiving my grandfather wound up in the hospital with a severe case of sepsis. The doctors told us he was literally knocking on Heaven's door. There's been a lot of crying and a lot of giving thanks over the past few days, as our old Energizer Bunny pulled through.

I'm hoping to snap some pictures today of a few things I've been working on around the house though. Trying to get back into blogging as I've missed how therapeutic it can really be for the soul. 

Hope you all enjoyed time with your families this week as much as we did!

Sunday, November 18, 2012

Beautiful Sundays


My Braemore fabric just arrived yesterday! Hopefully I'll have some progress or completed pictures sometime after Thanksgiving!


I have this Pinterest ritual I've been getting into each Sunday whenever possible. I take a few of the home remedy pins I've saved to my beauty and fashion board and test them out. I've discovered two so far which I love and wanted to share them here on the blog (I know I have a few readers out there according to my traffic count--hello and th♥nk you for reading!!). After all, what's the point of pinning without doing??


For this first one, the "original" pin (a.k.a. the one I found) says, "Make your skin glow with an easy home remedy in 5 min. 3 TBSP baking soda, 1 TBSP water, mix together well. Apply to face in circular motion. Let sit for five minutes. Rinse off with warm water. Say hello to healthy, glowing skin! Do this once a week." I can't honestly say that I've noticed more of a "glow" but it seems to work very well as an exfoliator/tightener/my skin seems much smoother after 3 Sundays of doing this. I don't follow the mixing directions as I found if the paste is too grainy, it tends to sting my somewhat sensitive skin. Either way, I'll definitely continue to do it.  


This second pin I'm totally in love with! Recently when I saw my stylist (Thursday), she commented on how amazing my hair felt (and I'm a natural chestnut brunette living life as a blonde, so my hair is definitely friends with chemicals)! She couldn't believe when I told her what I'd been doing: "For silky soft hair mix 3 parts olive oil and 1 part honey. Heat in microwave for 30-45 seconds (until it just begins to boil). Stir until well blended. When still warm, but cool enough to touch apply to damp towel dried hair and comb through. Wrap in towel or put up in a plastic shower cap or bag, let sit for 20-30 minutes. Rinse thoroughly, Shampoo, Condition." And the crazy thing is, my hair really is becoming that shiny and silky! I got the thumbs up to continue from my hair chicky, and it hasn't done any sort of damage/alteration to my color. 


Tonight I'm hoping to attempt an at-home French manicure using this technique (only I'll be using painter's tape because I have that on hand). Crossing my soon-to-be-manicured-fingers this turns out well! :)

Source: popcosmo.com via Amber on Pinterest
  

Saturday, November 10, 2012

The infamous Braemore

I can't help it but anytime I say the word "Braemore" I think of the world "claymore" and I'm instantly hearing Michael Westen's voice over telling me that a claymore is a directional anti-personnel mine used by the U.S. military, and you have to have a steady hand to disarm one. #burnnoticegeek 


In any event, I've been hooked on the Braemore Gazebo fabric in "Cloud" since I first saw it on John and Sherry's headboard in their master bedroom. And then (oddly enough) I saw it featured in an episode of Burn Notice and my obsession was ignited.


season 5, episode 5, "square one." you can see the gorgeous curtains about five to ten minutes from the end of the episode. 


I really really wanted those curtains in our bedroom. Right now it's looking very pretty and grey thanks to the silver bed frame and charcoal sheets, but this fabric is the perfect way to bring in more colors. And the chartreuse green and pretty blue fits in with the rest of our house perfectly! 

Of course it's been a while since YHL debuted their headboard (July 24) and that fabric has circulated around Pinterest like a wildfire. Thankfully, I found it online at 1502 Fabrics for $20 a yard (some places were asking $25+ per yard). I plan on hemming the sides to finish them but as far as the length goes, I want to leave them in all their glory. I may have to fold and tuck here and there, but I want to be able to reuse this fabric if/when we move out of the townhouse (sometime next year). 

Now for the impatient waiting game until the fabric arrives on my doorstep. 

Cue the Jeopardy music...

Saturday, September 29, 2012

Day 3

Today it's three days since we found out we will not be relocated for Jason's recruiting orders! The official word came down Thursday. He'll be recruiting out of Orange County, which is all of an hour north of where we live now (and conveniently, less mileage than what he's currently driving down to the recruit depot in San Diego). So we'll both be commuters. But we'll be commuters together.

Happy doesn't begin to describe how we feel. ♥

Tuesday, August 28, 2012

Victory is mine!

I finally, finally, finally settled on a paint color/finish for our bed frame! FINALLY. After a failed attempt at rusting, a messy try with my beloved Rubb n' Buff, and a fleshy tone mistake of a painting disaster, I tentatively perused the paint cages at Home Depot once again (I'm so glad our local store leaves them unlocked--I would hate to have to bug someone every. single. time. I visit.). The big shocker? It's not even a rust color. It's not even in the copper toned family (ha! sunscreen reference). The paint that won?


Rust-Oleum Hammered Metallic spray paint in "Silver." In real life, it's just as hammered, grooved, and textured as it is on the cap/nozzle/sprayer thing. So far I've only hit the finials (since it's going to be a pain to drag the whole bed frame down stairs one piece at a time), but I'm loving the results. Hoping to have most of the bed painted by the weekend, but because of the nature of the paint, the curing time seems to be a bit longer than regular spray paint (feels tacky for longer).  

In any case, I can't wait to see the finished frame! Now I can start focusing on the other parts of the room like hanging curtains, sorting out what books and decor I want on the shelves, and getting stuff organized (but in a cute way). 

Friday, August 24, 2012

Worth the wait

I know I mentioned in a previous post that we had yet to do anything in our dinning room. Part of the reason was our need to relocate our book cases (done!) but the biggest issue was it had become a dumping ground for boxes when we first moved in... ...and we never got around to moving them. But after four months of staring at a pit of ugliness (and chaos), we braved the clutter and got our butts in gear. 

And holy crap was it worth the wait. I refused to take any sort of before shots, so believe me when I say these afters are even better than I could have imagined.


Ignore the bare bulb. We have a light fixture ready to be hung, we just need a ladder. The room feels little off kilter, as there's some open space to the right of this photo (we have plans to keep our eye out for an old rusted serving cart or something similar), but I didn't want to off center the table from the light. 


Our little Tessie étagère gives us a spot to drop sunglasses (we have hooks for bags and keys on the other side of the door) and coral all her goodies; from her treats, to her leashes, to her bubble machine (she loves to chase bubbles), it's all pretty and organized in a vintage soda crate.


The corner hutch that I refinished back at the old house has a new home int he corner of our dinning room. I had the most fun decorating this time around. I stuck with white, silver, glass, and wood tones to play off the blue back drop and the rest of dinning room. The globe on top is from Pottery Barn (marked down to $12!), and I love how the water is black rather than blue. Jason has a thing for globes.


My little glass collection is hiding in the cubby below. My (not so) vintage coke bottles, an Eiffel tower bottle Jason and I bought for our very first apartment, and a small sampling of my many mason jars.


Some items I kept from the original set up at the old house, but since I was working with a new color scheme, I had fun finding new items to show case (like the cake topper from our wedding).


In my vintage milk glass candy dish I used some leftover reindeer moss from the copper bird cage and dropped in some eggs for a little pop of color.


Every time I walk downstairs now I have to pause and stare dreamily at how it looks. We even managed to to do upgrades to living room to make it feel more cohesive, but that will have to wait for another post!

L♥ve.

Monday, August 20, 2012

Hammer time

NOTE: to anyone who takes home wedding centerpieces, double to check to see how much of it is real and what (if anything) is fake. Imagine my surprise/squeeged-ness when I realized the moss under my bird'd nest was real, and thanks to the moisture from the floral foam was starting to grow mold! Squeege! 

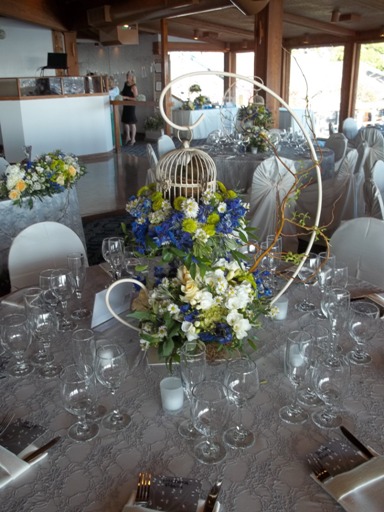
Along with all my other painting trials and tribulations this week, I managed to repaint the ivory birdcage I stole from a centerpiece at my sister's wedding (are you sick of that link yet??). I could have left the cage the way it was, but I wasn't digging the white finish at all. Metals in our house tend to have color to them be it bronze, silver, or black. And this time, I wanted to go with something a little warmer.


Since I'm currently obsessed with finding a rusted finish for our bed frame, I wanted to stay in the same general color family with the birdcage (especially since it wouldn't be in our bedroom, I wanted to carry that color throughout the house in another way). So I grabbed Rust-Oleum's Hammered finish spray paint in "Copper" and went to town on the little cage (once it was flower, foam, and mold free).


Once it was finished, I grabbed some reindeer moss from Pottery Barn and built up a bade for the bird's nest again, all while guaranteeing I wouldn't have a mold issue in a week or two. Plus, come fall I'll probably swap it out for a leaf garland, and in winter some holly berries. Gotta love decor that can stay out year round with just a few minor tweaks!  


I popped it into a tray that has been all over our house in one way or another (from JoAnn's of all places), and completed the vignette with some of my favorite Irish-themed books, and the whimsical wood carved mushrooms we grabbed at the county fair last year (we tried to find more this year, but sadly we didn't see any we liked).


Loving the warmth the copper cage adds to all the blues and greens we have going on in the living room. I'm in the midst of decorating the wall-unit-turned-tv-console that it's sitting on, so I'll be back with more pictures of that (hopefully) soon!

Tuesday, August 7, 2012

Strike three

If there's one thing I know about this bed project is once I'm done with it, I should be absolutely in love with  our bed frame because I've exhausted every possibility for colors, textures, and finishes. But unfortunately, that time just isn't here yet. 

Jason and I ran to Home Depot on Sunday and grabbed three different cans of Rust-Oleum spray paint (I'll touch on what we did with the other two cans later this week). The one I grabbed for our bed was in their textured finishes line and was called "Lumber." The finish on the cap looked and felt like what I was going for; even though I had gone with the plan of buying "Autumn Brown," when I got there it seemed too dark. So "Lumber" it was.


Should have gone with "Autumn Brown!" The color was much more flesh toned in real life. Not at all like the caramel color the cap had on it. I was so unimpressed I didn't even finish painting the finial from our bed.

Am I kicking myself for not grabbing my original choice? YES. But when I go back, I think I'll take a good hard look at each of their textured finish colors, because the feel of the paint when it's dry is perfect. It feels very bumpy and rough, and if I can find the right color I know I'll achieve the look I'm going for.  

Just not on this round...